Thursday, 20 November 2014

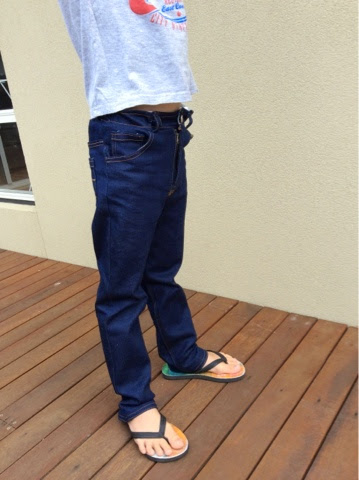
Small Fry Skinny Jeans


This pattern was in the Perfect Pattern Parcel #4 and the designer of the pattern is by Titchy Threads.

You can also buy the pattern direct from the Titchy Threads website.

As usual, I buy the parcel and don't get around to making anything until months later - partly, I think, because PPP are located in the US and the seasons are the opposite time of year to what we get here in Australia, so some of the patterns aren't appropriate for me to make straight away.

This project was a bit scary for me because, well.....JEANS..... Hand made jeans! Eeeek.

The pattern  got printed and cut, then sat on my 'to do' pile for a couple of months. I actually cut the denim too....and then it sat....and sat.... Until I realised my son had grown too tall for his current jeans! So, I thought I better get to it, especially seeing as I'd cut the fabric too!

I cut the pattern a size 8 for my son, allowing for growing room. He's very tall for his age (he's almost 6).


You have the option to make the jeans with a half fly, or a full fly. I originally wanted to make them with the half fly because it didn't require attaching a zipper (I hadn't ever attached one before). I ended up telling myself to "man up" and give the zipper version a go.
I didn't have a zipper in my sewing stash, so I grabbed my old pal, the seam ripper, and I removed a zipper from a pair of my husbands old jeans.

I also chose to make the top stitching version and I used a rust colour thread to contrast against the dark blue denim. I wanted to give them a 'professional shop bought jeans' look.


I really enjoyed doing the top stitching, I love the effect it gave and I think I did a pretty ok job at it too.

I fumbled a bit with the instructions, especially with the sections around the fly area.... But I got there in the end! I was pretty stoked at how I went attaching the zipper too. Beginners luck, maybe?!


Once the fly was attached, it was just a matter of sewing the legs together, then putting the waistband together.

For the lining inside the waistband and pockets, I chose a pale blue cotton fabric. I really wanted them to look like 'real' jeans.

Along with the waistband, I had to make and attach belt loops.

I did think, halfway through, that I'd bitten off more than I could chew with these jeans. But I stuck it out and pulled it all together.

I possibly could have altered the pattern to be smaller in the butt area and longer in the legs, but I just went with the standard size 8 on the pattern. 
I love that the waistband has button hole elastic in it, which allows the jeans to fit my son, without falling off his bum all the time (this is what shop jeans do to him). And honestly, I hate wearing a belt, I'm sure my active 5yo will too! 
So, finally, jeans that fit my boy and don't give him a plumbers crack.,,, that's a win in my book!! 


The top stitching on the back pockets got a little wonky in places, but from afar you can't tell.


They look pretty great I think!!


It makes me super happy to know that "I made his jeans". Very satisfying!

:-)


Saturday, 15 November 2014

Froothie Optimum 9400 Blender Review


It has been almost 2 years since I've been of eyeing off Vitamix blenders. We eat super healthy, love juices and smoothies. I make heaps of raw food, treats, snacks etc. but found that between the crappy old blender we had and my food processor, there was only so much I could do.

My husband recently started going to the gym heaps more and he wanted to get on board the 'green smoothie train' so he was at the point of also wanting a better blender.
I watched countless comparison videos, comparing the Vitamix to other high speed blenders. They left me more confused and a little apprehensive. Which one do I buy??? When presented with too many options, I get a little overwhelmed.

As we all know, the Vitamix costs a LOT of money. This, obviously is a massive deciding factor for many people, us included! The reviews I had read online are not great. They are ok, but for that price, the blender should also be able to wash the dishes and vacuum the floor for me!

I was under pressure, I was *this* close to ordering one a few months back, seriously, I was going online to buy one.  I googled 'Vitamix Australia' and the first thing that came up was an advert to the Froothie website. It had the description "do not buy this blender - trial the Optimum blender for $471".

It was a sign! I was actually terrified of buying a Vitamix anyway, just in case it didn't live up to the hype... Or in case something went wrong with it, from what I've read, their customer service isn't great.

So, I clicked on the Froothie link to check it out!!

The Optimum 9400 blender looked JUST like the Vitamix, it had the tamper tool and everything. The specs on the Optimum showed it was even MORE powerful (a video showed it grinding up garden stones into dust!!!!!) than the Vitamix and it was HALF the price! I was pretty much sold at this point, however, I jumped onto the review sites, as you do, and had a bit of a read. I was very impressed with what I was seeing. It was really reassuring to read that people were extremely happy with the Optimum blender AND that the Froothie customer service team were also fantastic. Some people that had reported issues/faults with the blender on the review sites, had Froothie comment and help them out with replacement parts with no questions asked. THIS was the final decider for me.
I didn't have the gut wrenching, bad feeling I had when I was about to purchase the Vitamix.

So I purchased the Optimum 9400 from the Froothie website straight away! I ordered the silver one.
Shipping was supposed to take only 1-2 days (we are located in the same city as the warehouse) but because they were waiting on a shipment of the silver ones (just my luck!), I received mine in about 4 business days, which is still pretty good.

Unpacking the box was exciting, the blender was well packaged and it came with a raw food recipe booklet, a nut milk bag and the tamper tool.


I gave it a clean straight away and then made a fruit juice in it. I was really keen to see how it handled harder vegetables like carrot and beetroot and also how smooth it made the drink if it had seeds or nuts in it.

I made a juice with beet root, apple, orange, coconut water and some flaxseeds.... To my delight, it turned out smooth as silk. It makes a mean smoothie, I've made orange and poppyseed cake batter in it, I've made fresh fruit icy poles for the kids with it. It is actually, so good.


It had a pretty awful burning chemical smell that came from it while blending, which concerned me, but in the booklet it assures that this is normal for new machines. It is excess motor oil burning off and will go away within a few months of use. 

It has now been a few months, with regular daily use and the smell has mostly gone away but not entirely.

Back onto a positive note though...! 

I have made flour from quinoa (in photo below) that turned out amazing.


I've made almond meal, flax meal and one of my personal faves, hoummus! Yum!

I use it almost daily for smoothies, juices and dips and my husband uses it daily also, for smoothies after the gym. 

When making anything thicker than a smoothie, it is quite hard to get the last bit out of the bottom of the blender because the blades are in the way and you can't remove them.

The clean up is easy though. I usually just give it a rinse with water straight away to prevent stuff getting stuck to the jug. You can also half fill it with warm water and a tiny bit of detergent and pop it onto the base and turn it on. This ensures it gets any bits that might have been trapped in the blades.
Easy as!

The ONLY real problem I've had with it so far, is when I was making chocolate blackbean brownie batter in it, it overheated and turned itself off. I was a little worried that it blew up :-/
I turned it off, took the jug off and let the motor cool down while I finished stirring the batter with a spatula and scooping it onto a tray to go in the oven.
After 10 minutes I put water in the jug to clean the chocolate batter out. I put it back onto the base, turned it on and hoped for the best.... It worked. Phew!!!
I can only think that the batter was a little thick for the blender? I'm not sure... As it's coming into summer here in Australia, it's going to get a very thourogh work out making raw cakes and ice creams, so I'll update this post again in a few months to let you all know how it's going and if I've encountered any more problems.

One thing I do recommend buyng though, that doesn't come with the Optimum, is a silicone scraper. Using a metal spoon is not a good idea to scoop out your food because it WILL scratch the jug badly. 
I purchased a bundle of 3 or 4 silicone spatula spoons with wooden handles, from Coles, for about $5.00. So worth it t keep your jug in tip top shape!

So far though, I'm VERY happy with the blender!!

PS. Sorry for the lack of photos, I honestly didn't think I'd ever write a review for this, but because I'm so happy with it, I kinda felt like I needed to! 


Friday, 14 November 2014

QUESTION: Affordable Camera Suggestions


I want to buy a camera... Nothing too expensive, just something that is affordable AND takes decent pictures.

I'm just really sick of the grainy photos that come off my iPhone & iPad! They look great on the screen, then when I upload them, they look terrible!!! 

I've been looking at getting a Sony Cybershot similar to this.... 


I'd love some suggestions!


Friday, 7 November 2014

Healthy Strawberry Milkshake


I don't even remember the last time I bought a strawberry milkshake, or any other flavoured milkshake for that matter.

The shakes you buy at a store or cafe are most likely going to be made from a flavored syrup which is full of sugar, artificial colour and preservatives.

My kids can NOT handle such ingredients, within minutes, they are running around like crazy people - seriously, it's not cool. 
Because we don't consume these additives at all, the reaction is horrifying and is proof enough that we should keep on the path of keeping them out of our bodies.

I love a good milkshake though, so I've been tinkering around with a few ingredients that will satisfy my sweet milky cravings!

This recipie makes a mean organic strawberry milkshake! Without all the nasties but with added goodness. A healthy milkshake. 

Here is what I use to make it:

1 cup frozen organic strawberries
5 ice cubes
1 heaped tablespoon of white chia seeds (you could use black, they serve the same purpose, but your milkshake will have black bits in it)
1 tablespoon of raw honey
800ml organic raw milk


Add all ingredients into your blender jug and blend until everything is well combined!! So easy and so delicious!!

This amount serves 3 people in large glasses.

Serve and enjoy!! 


Friday, 31 October 2014

Handmade Scrap Doll (Lalaloopsy Style)


This doll was made entirely of things I had around the house. To be honest, I'm a bit proud of how she turned out!


I made her legs out of some left over fabric scraps. Her head, body and arms were made from an old white, long sleeved top of mine that was too small.  I cut the arms off my top and with a grey lead pencil, drew a rough outline of the shapes I needed for the body parts.

I stuffed the inside of the doll with the filling from a cushion that I never got around to making a cover for, oops! Now I guess I need to make more dolls to make use of the half cut open cushion ;-)

I pulled a single thread (out of 3) from a ball of black wool, to stitch her button eyes on, as well as her eyelashes and mouth. I gave her a Lalaloopsy style face. It was so easy to re-create!

I cut the pink circles for her cheeks from an old pillowcase. I just used white cotton thread to stitch on her rosy pink cheeks, in a rustic, scrap doll kind of way!

I put an icy pole stick inside her head/neck, to keep her head upright, seeing that she is a little top heavy! Then I hand stitched her head to her neck for more support.

Her arms and legs were all hand stitched to her body.

I cut lengths of black wool to create her hair and then sewed it down the middle to create a 'part' for her. I used some PVA glue to hold it all down on her head. I then plaited her pig-tails when the glue was dry.

Her outfit was created with no pattern either. I cut up one of my husbands old cotton work shirts for the black bodice and I used some white tulle left over from our wedding for the tutu skirt. I also cut out a heart from the same pillow case that I used for her pink cheeks.

I made the dress with a closure at the back and used stick on velcro. I ran the overlocker around the edges of the black dress neckline for a little bit of detail.


My daughter absolutely LOVES this doll. She named it 'Marcelene' because she thinks it looks like Marcelene from Adventure Time. 


Thursday, 30 October 2014

Zebra Print Hudson Pants


The moment I saw these pants in Perfect Pattern Parcel's 6th parcel, I knew I had to have them. The pattern is by True Bias.

I pretty much live in studio/harem style pants and leggings. I'm all about the comfort factor.

The Hudson Pants had a similar style to the pants I most often wear, although the Hudson's are a little slimmer in the legs.  The studio pants I wear normally are a bit baggier. 

I chose a zebra print polyester knit to make the pants with and I just used a basic black for the pocket detail, waistband and ankle cuffs.


I decided against using a tie on the waist because my washing machine eats ties like those for breakfast!


The pattern was pretty easy to sew up. I was excited because I got to use my new overlocker for the first time on an actual garment. Its amazing how much quicker things come together using one! I'm sure I'll get the hang of the overlocker in no time. I am happy with how the pants turned out!


I made the size 12 and they fit me perfectly. No adjustments were needed to be made.

I dressed them up a little and wore them out today to a meeting. So comfy! This will be the first of many pairs of Hudson Pants in my wardrobe!


You can purchase this pattern for a short time in Parcel #6, along with 5 other awesome ladies clothing patterns, from Pattern Parcel. They are all by indie designers and I think it's great to be able to support them.

Donations from Pattern Parcel also go to supporting children's education. So, what are you waiting for?! Go get it while the parcel is still available! Once its gone, its gone forever!!!

I'm excited to see what Parcel #7 will be! 


Saturday, 18 October 2014

Sourdough Starter

I've dabbled with the sourdough starter a few times now. The first time, we moved interstate and I never got to actually bake anything with it. The second time, after a few batches that started smelling like nail polish remover, I managed to bake a couple of great sourdough loaves. The process was time consuming and the house we were living in was old and cold and I just don't really think I was growing or collecting the right types of wild yeast, so I ditched the whole idea because I wasn't sure if I had the method right.

Fast forward 8 months, to now. We are buying organic sourdough spelt and sourdough rye loaves at $7 a pop, from our local organic fruit and veggie store. The kids have decided that they LOVE the sourdough as toast and we go through the loaves very quickly. Funnily enough, they wouldn't eat the loaves I had baked months earlier! I think that because we don't buy bread at all, other than the loaves we have just started purchasing, they think it's a bit special and fancy to have toast, hehe.

I have stomach issues when I eat wheat, so does my daughter, so we are a gluten free household. I read ages ago, that some people who are intolerant to gluten, can eat sourdough with no problems, because during the fermentation process the gluten is broken down by the bacteria in the yeast/starter.  So of course, I had to give it a go!
The loaves I baked myself seemed to be great on my stomach, I had no problems, but I am finding that the loaves we are buying now, give me a pain in the stomach and they just taste a bit....meh.

Our organic fruit and vegetables, raw milk and yoghurt, sourdough bread and eggs today cost me a whopping $201.87 in total. So, so expensive.
I decided that we REALLY need to cut back that cost a bit!!!!! One of the ways will be to have another crack at growing another sourdough starter, so I can at least bake our own bread.

We have moved to a new area, fresh country air and a lovely new house. I am confident that I should have better luck this time. Third time lucky!

**** In my previous attempts, I've used the flours mixed with fresh squeezed orange juice to give a little acid to help the starter grow, this time I'm just using Pureau filtered water.  ****


Here is what I've used this time...


DAY 1

3 level tablespoons of organic rye flour
3 level tablespoons of organic white flour
8 tablespoons of filtered water

Mix into a wide mouth mason jar (mine is 300ml I think. I might need to use a bigger jar later on).
I took mine outside into the fresh air and mixed it out there, hopefully I caught some lovely wild yeast in the wind!


Cover with a cheesecloth and leave in a warm spot inside. 20 - 24 degrees Celsius is ideal for the starter to grow.
I have left mine in the kitchen, on the bench next to the stove.


DAY 2

Not much going on here today. The starter looked a little dry so I gave it a stir and put the cloth back on and left it.


DAY 3

I checked it this morning, it was super dry still and I couldn't see any signs of life. I decided to mix in another tablespoon of pure water and I covered it with the cloth again and put it on our outside table in the sunshine (it was 26 degrees Celsius today and warmer outside than inside). 
I was hoping that the warmth from the sunshine might give it a bit of a boost along....

Later in the afternoon, I checked the starter again. BINGO! Alive! It's ALIVE!!!!!

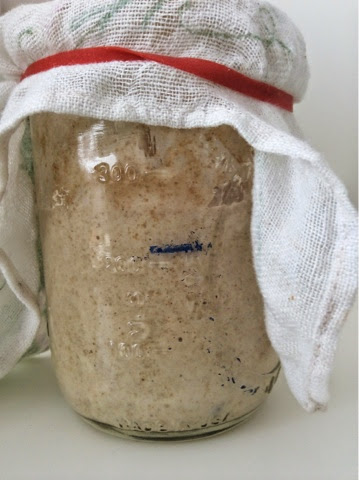
As you can see from the pictures below, there are bubbles that have started to form.... Woohoo!


Now that it is active, I fed it the following:

3 level tablespoons organic rye flour
3 level tablespoons organic white flour
5 tablespoons Pureau water (room temp.)

I gave it a good stir and left it with its little cloth cover on, overnight on the kitchen bench. 


DAY 4

This morning when I got up, I placed it in a nice warm spot near the window. It clearly thrives off that little bit of warmth :-)

Night time is when I feed the starter. Tonight I was fairly happy with how it was coming along plenty of bubbles were forming and it had risen a bit too.


I gave the starter a good stir, then tipped out half of it and put it in the bin. I then fed it the following:

4 level tablespoons of organic rye flour
4 level tablespoons of organic white flour
10 tablespoons of Pureau water (room temperature)

I mixed it all together and put a little marker on the outside of the jar so I can tell how much it's rising.


DAY 5

I actually fell asleep last night and forgot to feed the starter....oops! 


DAY 6

This morning it had risen above the marker I left on it on day 4 and it was looking pretty bubbly. Phew, still alive!


I stirred it, tipped out half into the bin and fed it the following:

4 tablespoons of rye flour
4 tablespoons of white spelt flour
10 tablespoons of water

I stirred it all together and it was back at the original marker level I'd made on the jar the other day. I placed it in a warm spot in the bedroom.

I'm not sure if I made the right decision by adding spelt this time to the mix, but we'll soon find out I suppose! 

Note: 4 hours later, it had risen above the point of where it rose to before I refreshed it.


DAY 7 

Today I've been out and didn't get around to refreshing the starter until this evening. It had risen quite a bit, however, the bubbles were much smaller. I'm not sure why that is. At least it rose I guess!


I stirred, tipped out half and refreshed with the following:

4 tablespoons of organic rye flour
4 tablespoons of organic white spelt flour
4 tablespoons of organic white flour
12 tablespoons of water

I covered with the cloth and band and left to sit on the bench top. I also made a new mark on the jar. Hopefully soon I'll be able to bake a loaf!


DAY 8

I chose to leave the starter tonight. It looked like it could handle a little extra time between refreshes.


DAY 9

I refreshed tonight with:

4 tablespoons of organic rye flour
8 tablespoons of organic white flour
12 tablespoons water


DAY 10

I chose to leave the starter alone again today.

DAY 11

This morning I woke up and it had expanded so much, it was burstng out of the jar! I took the cloth off and washed it because it was covered in dough. I left the starter to sit for the rest if the day with an open top. It kept growing! The bubbles are starting to really go crazy now! I think it really likes the white flour in the mix.


NOTE:  I have noticed that the starter really hasn't had a proper fermentation type smell. It has just smelt like rye flour to me. 
The last few attempts of making a starter, I have used cling wrap (tut-tut!) over the jar. It caused the starter to smell like nail polish remover and I couldn't get rid of the smell (probably because of the cling wrap!). I didn't know, until this time around, that I should only cover with a cheesecloth.
Well, today, I FINALLY could smell a bit of a ferment-y type smell. Hooray!

I've been doing a test on it each time before I refresh... Apparently, if you drop some starter into a glass of room temperature water, it will float if the starter is ready to use for baking... According to this test, mine is not ready ;-)

Big bubbles!


Tonight, I will refresh with:

4 tablespoons organic rye flour
8 tablespoons organic white flour
12 tablespoons luke warm water (thought I'd give it a shot to see if it would help the starter ferment quicker)
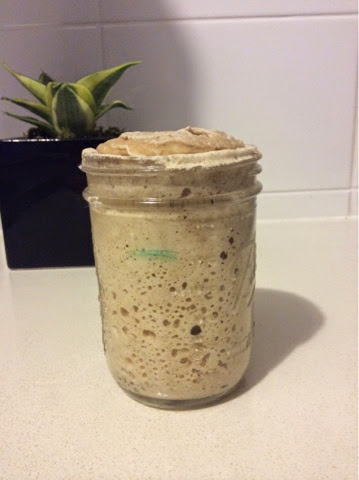
NOTE: Before I refreshed the starter, I thought I'd give the 'drop a blob in some water' test another shot. It sank....meh. I pushed it to the side and continued to refresh the starter.... When I was finished, I looked over and the blob in the water was FLOATING!!!! 
I also noticed that tonight, the starter had quite a fruity, ferment-y kind of smell. Yay! 


DAY 12

This morning, the starter had risen more than ever in the short timeframe since I refreshed t last night. I had previously been leaving it up to 2 das to get this result, where now, it has only taken 8 hours.


I think it's ready!!!! 


I'm glad I didn't use orange juice in this starter. I don't think it needed it. Water and flour seem to have worked perfectly for me. 

Today, I'm going to prepare a trial loaf and see how it turns out! I will write about the loaf in a new post :-)