Yes, I've been missing in action lately. I've had a whole bunch going on in my world and I haven't been posting anything into the blog. I have been pretty absorbed in a few other projects. I haven't been making any clothes, but I have been designing my own dolls.
On top of being a new business owner, a designer, a mum, a wife and a sister, housekeeper, chef etc. I have let my blog slide a little….oops. It's hard to be everything!!!
I do need to get back into some kind of routine. Christmas really threw me out of whack!
Anyway, I haven't disappeared completely - I'll be back!
I have got a couple of drafts that I've started writing over the past month, but not got around to finishing them yet and I have been practicing taking product photo's with my new camera (which also requires a separate post…..long (or short) story…ugh.
You can expect another product review and more healthy recipes!
:-)
Wednesday, 14 January 2015
Sunday, 21 December 2014
Scary Bobbins - Funky, Modern and Quirky Dolls

I have a new venture that I've been working on and I'm excited to share it with you!
My obsession with sewing has led me down the sweet garden path of doll making. Soft rag dolls, actually. Awesome modern ones.
It all started when I made a doll for my daughter, out of scraps. You can find the post for that doll here.
And its safe to say, I think my technique has improved since then ;-) Practice makes perfect, right?!
As a little girl, myself, I loved dolls. I had so many of them and they were my favourite things to play with. I have fond memories of playing with them and mothering them. I had quite the imagination then and I still do now.
These days, I am blessed to be able to watch my own daughter playing and using her imagination, just like I used to.`
Making dolls, creating them from nothing, bringing them to life and giving them their own little personalities brings me so much joy! It makes me so happy that other little girls all around Australia (not internationally - yet) are able to have these fun dolls in their lives.
This has been very therapeutic for me and has filled a hole somewhere inside me - maybe my inner child has pushed me in this direction ;-)
I've recently hand drafted my own original pattern and made a couple of dolls from it. I'm really, really happy at how the finished product has turned out.
My dolls are made using high quality fabrics that are fun, modern and a little quirky. Their sweet faces are hand embroidered. Most importantly though, they are handmade with love and care!
 |
| This is 'Aurora, the Goddess of Dawn'. She is a one of a kind made using my original pattern. She is the first item in my Boutique Range. |
Tuesday, 16 December 2014
Advertising Experiment
You may have noticed some changes here on the blog, in the form of advertisements. I do not have a lot of traffic to my site, however, it is more of a personal experiment that I am conducting.
For sometime now, I have been battling with getting approved by Google AdSense. Because I used to have an old Wordpress blog that had all my recipes on it, that was the one and only site that AdSense would allow me to use. Seeing as I started up my new blog here, I wasn't able to get ads on this page by Google. Considering that my old bog was never even actually approved to have ads, it was 'under review for a year. So it was a little annoying that I couldn't just transfer the application to my new blog….I tried and I gave up….ugh...
After a little research, I came across Qadabra and decided to give it a shot. I applied for an invitation on Sunday and was accepted on Tuesday, so there wasn't the ridiculous waiting time like I experienced with AdSense.
I simply confirmed my email and started implementing ads right away….no waiting for approvals, I used the HTML/Java gadget in the Blogger 'Layout' section and they published immediately. Fast and easy! I struggle trying to implement anything into the 'Template' in amongst all the code…. I haven't worked out all that stuff yet!
So, within 15 minutes I had ads up an running. Can't believe I wasted so much time and energy battling with Google AdSense!!! GAH!
You simply tell Qadabra what kind of page you are - blog, DIY, health, personal interest etc. and they create ad placements suited your particular site. Just as their catch phrase suggests, it really was 'Magically simple'!

Anyway. My reasoning for doing this, you ask? You may already know, but I am a stay at home mum. I homeschool my kids and I sell some of the handmade dolls that I make on Etsy here (I'll make a separate post for that sometime soon).
One of my children is Autistic and I'm unable to work because I am a full time carer. I am doing what anyone else in my situation would do - try and generate some kind of income from home! It might not be a lot, but every cent counts, right?!
So, yes. I have ads on my blog. Some will hate it, others will understand. I will continue to post once a week for now, wether it be some of my healthy recipes or things that I've made. I've got no idea if I'll even earn anything at all from this blog, but I'm giving it a shot! I'll let you know how its going in a few months time.
For sometime now, I have been battling with getting approved by Google AdSense. Because I used to have an old Wordpress blog that had all my recipes on it, that was the one and only site that AdSense would allow me to use. Seeing as I started up my new blog here, I wasn't able to get ads on this page by Google. Considering that my old bog was never even actually approved to have ads, it was 'under review for a year. So it was a little annoying that I couldn't just transfer the application to my new blog….I tried and I gave up….ugh...
After a little research, I came across Qadabra and decided to give it a shot. I applied for an invitation on Sunday and was accepted on Tuesday, so there wasn't the ridiculous waiting time like I experienced with AdSense.
I simply confirmed my email and started implementing ads right away….no waiting for approvals, I used the HTML/Java gadget in the Blogger 'Layout' section and they published immediately. Fast and easy! I struggle trying to implement anything into the 'Template' in amongst all the code…. I haven't worked out all that stuff yet!
So, within 15 minutes I had ads up an running. Can't believe I wasted so much time and energy battling with Google AdSense!!! GAH!
You simply tell Qadabra what kind of page you are - blog, DIY, health, personal interest etc. and they create ad placements suited your particular site. Just as their catch phrase suggests, it really was 'Magically simple'!
Anyway. My reasoning for doing this, you ask? You may already know, but I am a stay at home mum. I homeschool my kids and I sell some of the handmade dolls that I make on Etsy here (I'll make a separate post for that sometime soon).
One of my children is Autistic and I'm unable to work because I am a full time carer. I am doing what anyone else in my situation would do - try and generate some kind of income from home! It might not be a lot, but every cent counts, right?!
So, yes. I have ads on my blog. Some will hate it, others will understand. I will continue to post once a week for now, wether it be some of my healthy recipes or things that I've made. I've got no idea if I'll even earn anything at all from this blog, but I'm giving it a shot! I'll let you know how its going in a few months time.
Friday, 12 December 2014
Say Cheese!
Well, ladies and gentlemen... I have some wonderful news….

You will be happy to know that I FINALLY bought myself a big girl camera! I'm insanely excited about this....I bet you are too, especially if you've been reading my posts and cringing at my awful, grainy, blurry iPhone and iPad photos!
If you read my post a few weeks back, I was looking at getting a little pocket camera. Nothing fancy, just a point and shoot. I'm in no means a photographer, nor do I have any idea about cameras. I just want to point and shoot....no fuss.
Everyone that replied to my question, on here as well as on my Instagram, all recommended I get a DSLR, however, just that abbreviation alone scared the crap out me and I kept leaning back toward the el cheapo digital pocket camera.
Before ditching the idea altogether, I did a little research on some DSLR cameras (that I later learned stands for Digital Single Lens Reflex - gah! Complex stuff right there!!!).
I had a few brands that I looked at but I think the Canon stood out for me - not sure why, I was honestly going off a gut feeling, because I have absolutely zero camera knowledge.
I ended up picking up a DSLR camera in pristine condition on eBay for an absolute bargain.
I got a Canon EOS 450D / Digital Rebel XSi. It has 12.2 mega pixels and it came with a 18 - 55mm IS lens. The seller was absolutely awesome and he threw in a Canon EF 75 - 300mm zoom lens and a Manfrotto Tripod. Merry Christmas to me!!
He was super sweet and gave me a full run down on how everything worked on it, tips and tricks etc. That was much needed.... I feel somewhat a little more comfortable with the camera at least now!
I had a bit of a play with it today and cannot WAIT to get some more great shots with it.
The photos just so not even compare to my iphone pictures now. They hit them out of the park! Yew!
Thanks to everyone who pushed me in the direction of a REAL camera.
I'm looking forward to being able to get photos printed and blown up with them not being grainy and terrible.
My family better get used to having a camera jammed in their faces..... I'm going to get all paparazzi up in here!
*********************************************************************************
Today, the kids and I went for a walk to take a few snaps. I was absolutely stoked at the results and quality of them (not hard comparing to iPhone pictures I suppose) but for a non-photographer, I think I got some pretty cool snaps of the kids.
I am busting to finish typing this post so I can get to the uploading! I can't wait to see the difference….
Here it goes………!
NOTE - I was originally going to write a rather lengthy post about the making of this dress, however, I've been busy, so I thought I'd just add the photos of it here and merge the new camera/pinafore dress into one post.
This is a dress that I made for my daughter recently. I used a New Look pattern that I scored from an op shop for about $2.


It's a gorgeous little dress. It has buttons on either side of the bodice as well as one button on the top left shoulder.
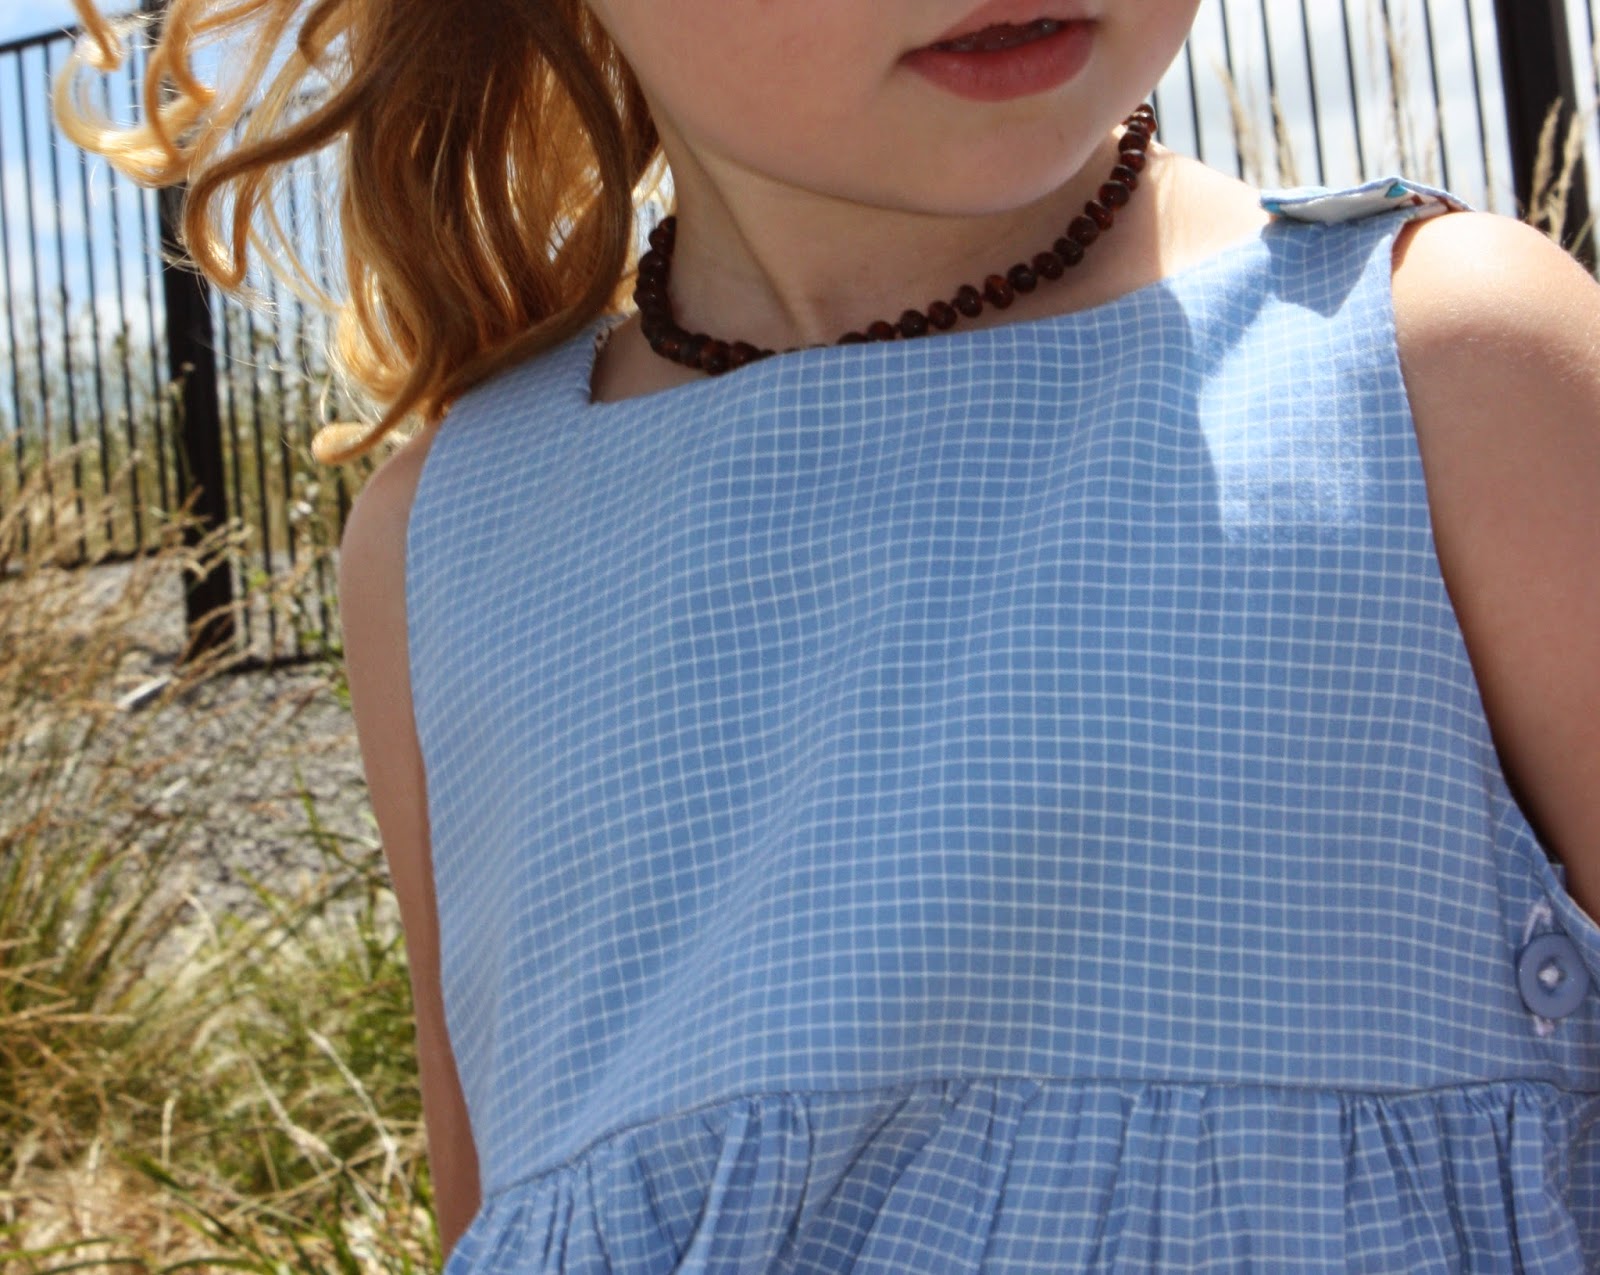
It's a perfect little dress for summer! Nice and breezy. I made it with some op shop fabric also. Its a lightweight cotton.

Here is a bird, photo bombing my son...

Last one…. A photo my eldest son took of my daughter and I.

I am over the moon with the quality of the camera and the photos!!!!! Best investment ever :-D
I'd love to hear your thoughts!
*********************************************************************************
Today, the kids and I went for a walk to take a few snaps. I was absolutely stoked at the results and quality of them (not hard comparing to iPhone pictures I suppose) but for a non-photographer, I think I got some pretty cool snaps of the kids.
I am busting to finish typing this post so I can get to the uploading! I can't wait to see the difference….
Here it goes………!
NOTE - I was originally going to write a rather lengthy post about the making of this dress, however, I've been busy, so I thought I'd just add the photos of it here and merge the new camera/pinafore dress into one post.
This is a dress that I made for my daughter recently. I used a New Look pattern that I scored from an op shop for about $2.
Excuse the terrible ironing job, it was a bit 'hurry up an put this on so we can go take some photos!!!'.
It's a gorgeous little dress. It has buttons on either side of the bodice as well as one button on the top left shoulder.
It's a perfect little dress for summer! Nice and breezy. I made it with some op shop fabric also. Its a lightweight cotton.
Here is a bird, photo bombing my son...
Last one…. A photo my eldest son took of my daughter and I.
I am over the moon with the quality of the camera and the photos!!!!! Best investment ever :-D
I'd love to hear your thoughts!
Monday, 1 December 2014
Gluten Free Banana and Walnut Muffins

Hello!
I’ve not been doing much experimenting in the kitchen over the past couple of weeks – life has been hectic and I’ve been working on a new project (details to come).
Anyway, I'm sure your here to read about muffins, so I'll get onto that....
My hubby picked up a huge amount of bananas through the week. The ones that don’t get eaten, we leave to get super ripe, then peel and break them up and store them in the freezer for smoothies.
The rest, I like to make banana muffins with! Yum!
This recipe I created myself, it began from just using a bit of this and a bit of that and hoping for the best! They work out amazing every single time.
They are gluten free and refined sugar free, however, they are not dairy free.
Perfect for school lunches, husband’s lunch box for work or just for mummy’s morning/afternoon tea!
You could freeze them too and just pull out as needed….this never happens in our house, they get devoured very quickly!
This was a bit of a rushed bake off tonight and I didn’t really take many photos, sorry! And yes, yes I know, the photos are HORRIBLE, I know, I apologise! I will be getting a 'big girl' camera soon, so please stay with me ;-)
Baking Time: 35 minutes
Makes: 21 muffins
Ingredients:
- 6 ripe bananas
- 1/2 cup natural organic yoghurt
- 2 teaspoons of organic vanilla essence
- 1/4 cup pure maple syrup
- 2 organic free range eggs
- 1/2 cup organic raw milk
- 3/4 cup crushed walnuts
- 1/2 cup Natvia (stevia)
- 2 teaspoons of cinnamon
- 3 cups gluten free self raising flour
Method:
Pre heat oven to 160 degrees Celsius (this is for a non fan forced oven).
Mix all the dry ingredients into a large mixing bowl. Combine well.
In a separate bowl, mash bananas and add all the wet ingredients. Combine well.
Pour the wet ingredients into the bowl with the dry ingredients.
Using a butter knife, mix gently until everything is combined together.
I like to use those fancy cafe muffin cases. I place them inside muffin pans and then half fill them with the mixture.
Sprinkle a mixture of Natvia, cinnamon and some crushed walnuts on the top, then place into the oven and bake for 35 minutes.


Once the timer has gone off, I leave them to rest, on the bench in the muffin tins. This allows the mixture to set properly. They don’t hold together well when eaten piping hot (unfortunately. I think it has something to do with the gluten free flour), straight from the oven. They are sort of gluggy and gluey (trust me, I’ve tried).
Once they have cooled though, they peel away from the paper cases perfectly and they are moist and delicious!
Best served with a nice big smear of organic butter! YUM…..
Enjoy!
Friday, 21 November 2014
DIY Summer Babydoll Dress

A few weeks back, I got this strech cotton-blend sunflower fabric from an op shop for $2. What a score! I pretty much decided immediately that I wanted to make a summery dress from it...
Now, I, personally, do not and will not wear ANYTHING with a fitted middle section... Let's face it, I've had 3 kids and my stomach isn't what it used to be.
The latest styles of ladies clothes for the past year or more, have had these waistlines that I refuse to wear... I mean really, where are all the baby doll dresses and baggy tops at?
My main focus, was to create a dress that disguised my stomach area and didn't bring attention to it! Seriously, fashion *ugh*!
I'm not the girliest of girls, I much prefer to wear pants and shorts and I really don't have many dresses at all. A comfy, casual babydoll dress might actually get a bit of wear from me.
So, I've put together a tutorial of how I made this little number... It was super easy and a beginner seamstress will be able to make this.
- First of all, you need to get yourself a singlet that fits you well and is also made from a similar fabric to the one you are sewing with. This will allow for correct sizing.

I only want to replicate the bust and shoulder straps really. I chose to use this Nike singlet because it isn't too tight and I like how the neckline sits.
You will need to lay your singlet flat onto your fabric.
I used tailors chalk to draw the outline. Keep in mind you only want to outline the FRONT of your singlet at this stage.
Using sharp scissors, cut around your outline.
(I am obsessed with tailors chalk and disapearing texta. I make the outline and then cut out. I find it quicker than pinning.)

Use your front bodice piece as a template for the back... I made the scoop on my back piece higher though.

Fold each piece in half to ensure each side is a mirror image. I just trimmed the areas that had a slight overhang.

You will now have 2 pieces. A front and a back bodice.

Here we will construct the bodice to try and get a good fit.
Lay the 2 pieces Right Sides Together and pin the top of the shoulders and down the 2 straight sides on the bodice. Make sure you don't pin the arm holes or the bottom!

Now we want to Baste the pinned areas. (Use the longest stitch on your machine but DONT back stitch.)

I put the basting at the width of the presser foot...


When you have Basted the pinned areas, take your pins out (if you haven't already) and turn yr garment out the right way.
Try your bodice on and see if any adjustments need to be made.

I needed to adjust the shoulders. I put pins in them while I still had it on so I could get the right fit.

I also needed to make the length of the bodice MUCH shorter. We are going for a babydoll dress remember!
I folded the length up and pinned that at the required length also.

I took off the top and ironed a crease where I'd pinned. Then I just cut along the crease line to shorten!

Once I had the bodice at the desired length, I took the excess material, draped it around myself and made a few marks with chalk for the length and width.
When doing the width, allow a bit extra because it will be gathered.

Once you have cut your skirt piece, you can gather one length, which will soon be attached to the bodice
To gather, baste 2 lines about a presser foot apart (those are technichal terms, right?!) and about 1.5-2 inches from the raw edge.
Don't back stitch the threads otherwise you won't be able to gather the fabric!

(I had a little helper who wanted to sew - with my help of course!!)

Pull both threads from either the top or the bottom of the stitching... I think mine was the 2 top threads.
Shuffle the fabric along until the whole side of the fabric is gathered evenly.

Ok, put your skirt piece aside for a bit... Let's get the neckline and sleeve trims sorted!
Lay your bodice flat and grab your tape measure. Roughly measure how long the front and back necklines are.
Mine were as follows:
Front neckline - 23.5" length, 4" width
Back neckline - 18.5" length, 2" width
Sleeves - 14" length, 2" width
I made the front neckline trim wider than the back neckline and the sleeves...
NOTE: This turned out to be not the smartest idea which I didn't think about until later on... Rookie error!!
So, make sure you make the front neckline AND back the SAME width!!

This is how I made the trims... Roughly measured the length and width and used the tailors chalk to mark it up, then cut along the white lines!


Once you've done the whole piece, fold it in half and press again... You will have something that ends up looking like this!

Repeat this procedure for the remaining trims (sleeves and back neckline).
Next, I pinned the trim to the raw edges...

And whipped it through the overlocker.... Too easy!
Repeat for all other trims...

The shoulder straps of the bodice will end up looking like this...

This was the point where a said a few choice words because I realized my stuff up with the mismatching trims... Argh!!!
Anyway, I tried to trim the excess a bit to fix it up as best I could... But if YOU make a dress, you won't make this mistake haha ;-)
Pin the sides of the bodice together and sew/serge seams....

Your bodice is now complete. Press all seams and then it's time to attach the gathered skirt.

The skirt will be evenly gathered like this...

Lay the bodice inside the skirt like this... The right sides of the fabric are together and the gathered raw edge is matching up to the raw edge of the bodice... Pin well the whole way around...

NOTE: You should actually do this BEFORE you gather the skirt. Worst tutorial ever! Haha!!
If you made it this far actually following my instruction, pin the sides of the skirt and sew/serge *face palm*

Right, moving back on to the skirt/bodice attaching!
Baste the skirt onto the bodice.... If you are really confident, you can serge or sew right away, but I personally prefer to baste first, sewing along in between the 2 gathering lines.

Once I was happy with the skirt placement, I went ahead and used the overlocker to sew the skirt on.

Next up, I pressed the seams and then last step, unpicking the basting stiches. And that's it!
I chose to keep the bottom of the skirt with a neat, raw hem :-)


Subscribe to:
Posts (Atom)