Friday 31 October 2014

Handmade Scrap Doll (Lalaloopsy Style)


This doll was made entirely of things I had around the house. To be honest, I'm a bit proud of how she turned out!


I made her legs out of some left over fabric scraps. Her head, body and arms were made from an old white, long sleeved top of mine that was too small.  I cut the arms off my top and with a grey lead pencil, drew a rough outline of the shapes I needed for the body parts.

I stuffed the inside of the doll with the filling from a cushion that I never got around to making a cover for, oops! Now I guess I need to make more dolls to make use of the half cut open cushion ;-)

I pulled a single thread (out of 3) from a ball of black wool, to stitch her button eyes on, as well as her eyelashes and mouth. I gave her a Lalaloopsy style face. It was so easy to re-create!

I cut the pink circles for her cheeks from an old pillowcase. I just used white cotton thread to stitch on her rosy pink cheeks, in a rustic, scrap doll kind of way!

I put an icy pole stick inside her head/neck, to keep her head upright, seeing that she is a little top heavy! Then I hand stitched her head to her neck for more support.

Her arms and legs were all hand stitched to her body.

I cut lengths of black wool to create her hair and then sewed it down the middle to create a 'part' for her. I used some PVA glue to hold it all down on her head. I then plaited her pig-tails when the glue was dry.

Her outfit was created with no pattern either. I cut up one of my husbands old cotton work shirts for the black bodice and I used some white tulle left over from our wedding for the tutu skirt. I also cut out a heart from the same pillow case that I used for her pink cheeks.

I made the dress with a closure at the back and used stick on velcro. I ran the overlocker around the edges of the black dress neckline for a little bit of detail.


My daughter absolutely LOVES this doll. She named it 'Marcelene' because she thinks it looks like Marcelene from Adventure Time. 


Thursday 30 October 2014

Zebra Print Hudson Pants


The moment I saw these pants in Perfect Pattern Parcel's 6th parcel, I knew I had to have them. The pattern is by True Bias.

I pretty much live in studio/harem style pants and leggings. I'm all about the comfort factor.

The Hudson Pants had a similar style to the pants I most often wear, although the Hudson's are a little slimmer in the legs.  The studio pants I wear normally are a bit baggier. 

I chose a zebra print polyester knit to make the pants with and I just used a basic black for the pocket detail, waistband and ankle cuffs.


I decided against using a tie on the waist because my washing machine eats ties like those for breakfast!


The pattern was pretty easy to sew up. I was excited because I got to use my new overlocker for the first time on an actual garment. Its amazing how much quicker things come together using one! I'm sure I'll get the hang of the overlocker in no time. I am happy with how the pants turned out!


I made the size 12 and they fit me perfectly. No adjustments were needed to be made.

I dressed them up a little and wore them out today to a meeting. So comfy! This will be the first of many pairs of Hudson Pants in my wardrobe!


You can purchase this pattern for a short time in Parcel #6, along with 5 other awesome ladies clothing patterns, from Pattern Parcel. They are all by indie designers and I think it's great to be able to support them.

Donations from Pattern Parcel also go to supporting children's education. So, what are you waiting for?! Go get it while the parcel is still available! Once its gone, its gone forever!!!

I'm excited to see what Parcel #7 will be! 


Saturday 18 October 2014

Sourdough Starter

I've dabbled with the sourdough starter a few times now. The first time, we moved interstate and I never got to actually bake anything with it. The second time, after a few batches that started smelling like nail polish remover, I managed to bake a couple of great sourdough loaves. The process was time consuming and the house we were living in was old and cold and I just don't really think I was growing or collecting the right types of wild yeast, so I ditched the whole idea because I wasn't sure if I had the method right.

Fast forward 8 months, to now. We are buying organic sourdough spelt and sourdough rye loaves at $7 a pop, from our local organic fruit and veggie store. The kids have decided that they LOVE the sourdough as toast and we go through the loaves very quickly. Funnily enough, they wouldn't eat the loaves I had baked months earlier! I think that because we don't buy bread at all, other than the loaves we have just started purchasing, they think it's a bit special and fancy to have toast, hehe.

I have stomach issues when I eat wheat, so does my daughter, so we are a gluten free household. I read ages ago, that some people who are intolerant to gluten, can eat sourdough with no problems, because during the fermentation process the gluten is broken down by the bacteria in the yeast/starter.  So of course, I had to give it a go!
The loaves I baked myself seemed to be great on my stomach, I had no problems, but I am finding that the loaves we are buying now, give me a pain in the stomach and they just taste a bit....meh.

Our organic fruit and vegetables, raw milk and yoghurt, sourdough bread and eggs today cost me a whopping $201.87 in total. So, so expensive.
I decided that we REALLY need to cut back that cost a bit!!!!! One of the ways will be to have another crack at growing another sourdough starter, so I can at least bake our own bread.

We have moved to a new area, fresh country air and a lovely new house. I am confident that I should have better luck this time. Third time lucky!

**** In my previous attempts, I've used the flours mixed with fresh squeezed orange juice to give a little acid to help the starter grow, this time I'm just using Pureau filtered water.  ****


Here is what I've used this time...


DAY 1

3 level tablespoons of organic rye flour
3 level tablespoons of organic white flour
8 tablespoons of filtered water

Mix into a wide mouth mason jar (mine is 300ml I think. I might need to use a bigger jar later on).
I took mine outside into the fresh air and mixed it out there, hopefully I caught some lovely wild yeast in the wind!


Cover with a cheesecloth and leave in a warm spot inside. 20 - 24 degrees Celsius is ideal for the starter to grow.
I have left mine in the kitchen, on the bench next to the stove.


DAY 2

Not much going on here today. The starter looked a little dry so I gave it a stir and put the cloth back on and left it.


DAY 3

I checked it this morning, it was super dry still and I couldn't see any signs of life. I decided to mix in another tablespoon of pure water and I covered it with the cloth again and put it on our outside table in the sunshine (it was 26 degrees Celsius today and warmer outside than inside). 
I was hoping that the warmth from the sunshine might give it a bit of a boost along....

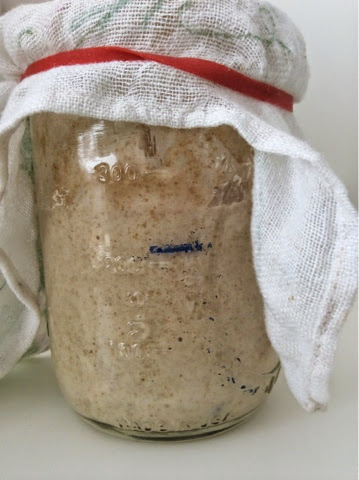
Later in the afternoon, I checked the starter again. BINGO! Alive! It's ALIVE!!!!!

As you can see from the pictures below, there are bubbles that have started to form.... Woohoo!


Now that it is active, I fed it the following:

3 level tablespoons organic rye flour
3 level tablespoons organic white flour
5 tablespoons Pureau water (room temp.)

I gave it a good stir and left it with its little cloth cover on, overnight on the kitchen bench. 


DAY 4

This morning when I got up, I placed it in a nice warm spot near the window. It clearly thrives off that little bit of warmth :-)

Night time is when I feed the starter. Tonight I was fairly happy with how it was coming along plenty of bubbles were forming and it had risen a bit too.


I gave the starter a good stir, then tipped out half of it and put it in the bin. I then fed it the following:

4 level tablespoons of organic rye flour
4 level tablespoons of organic white flour
10 tablespoons of Pureau water (room temperature)

I mixed it all together and put a little marker on the outside of the jar so I can tell how much it's rising.


DAY 5

I actually fell asleep last night and forgot to feed the starter....oops! 


DAY 6

This morning it had risen above the marker I left on it on day 4 and it was looking pretty bubbly. Phew, still alive!


I stirred it, tipped out half into the bin and fed it the following:

4 tablespoons of rye flour
4 tablespoons of white spelt flour
10 tablespoons of water

I stirred it all together and it was back at the original marker level I'd made on the jar the other day. I placed it in a warm spot in the bedroom.

I'm not sure if I made the right decision by adding spelt this time to the mix, but we'll soon find out I suppose! 

Note: 4 hours later, it had risen above the point of where it rose to before I refreshed it.


DAY 7 

Today I've been out and didn't get around to refreshing the starter until this evening. It had risen quite a bit, however, the bubbles were much smaller. I'm not sure why that is. At least it rose I guess!


I stirred, tipped out half and refreshed with the following:

4 tablespoons of organic rye flour
4 tablespoons of organic white spelt flour
4 tablespoons of organic white flour
12 tablespoons of water

I covered with the cloth and band and left to sit on the bench top. I also made a new mark on the jar. Hopefully soon I'll be able to bake a loaf!


DAY 8

I chose to leave the starter tonight. It looked like it could handle a little extra time between refreshes.


DAY 9

I refreshed tonight with:

4 tablespoons of organic rye flour
8 tablespoons of organic white flour
12 tablespoons water


DAY 10

I chose to leave the starter alone again today.

DAY 11

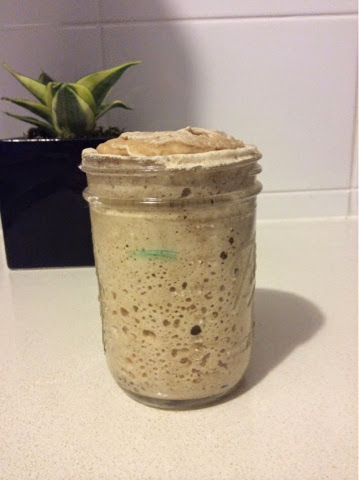
This morning I woke up and it had expanded so much, it was burstng out of the jar! I took the cloth off and washed it because it was covered in dough. I left the starter to sit for the rest if the day with an open top. It kept growing! The bubbles are starting to really go crazy now! I think it really likes the white flour in the mix.


NOTE:  I have noticed that the starter really hasn't had a proper fermentation type smell. It has just smelt like rye flour to me. 
The last few attempts of making a starter, I have used cling wrap (tut-tut!) over the jar. It caused the starter to smell like nail polish remover and I couldn't get rid of the smell (probably because of the cling wrap!). I didn't know, until this time around, that I should only cover with a cheesecloth.
Well, today, I FINALLY could smell a bit of a ferment-y type smell. Hooray!

I've been doing a test on it each time before I refresh... Apparently, if you drop some starter into a glass of room temperature water, it will float if the starter is ready to use for baking... According to this test, mine is not ready ;-)

Big bubbles!


Tonight, I will refresh with:

4 tablespoons organic rye flour
8 tablespoons organic white flour
12 tablespoons luke warm water (thought I'd give it a shot to see if it would help the starter ferment quicker)

NOTE: Before I refreshed the starter, I thought I'd give the 'drop a blob in some water' test another shot. It sank....meh. I pushed it to the side and continued to refresh the starter.... When I was finished, I looked over and the blob in the water was FLOATING!!!! 
I also noticed that tonight, the starter had quite a fruity, ferment-y kind of smell. Yay! 


DAY 12

This morning, the starter had risen more than ever in the short timeframe since I refreshed t last night. I had previously been leaving it up to 2 das to get this result, where now, it has only taken 8 hours.


I think it's ready!!!! 


I'm glad I didn't use orange juice in this starter. I don't think it needed it. Water and flour seem to have worked perfectly for me. 

Today, I'm going to prepare a trial loaf and see how it turns out! I will write about the loaf in a new post :-)


Friday 17 October 2014

Chocolate Chia Pudding


I was out with the kids at a picnic the other day and I took 4 wide mouth mason jars that I'd prepared with this chia pudding in it, for the kids and myself. One of the mums there asked what was in the jars. As I described how I made the pudding, she turned to another parent and said "oh, that's the new chia seed fad, it's all in fashion now, everyone is eating it". I was a little disheartened by her response, and I told her how much of a versatile seed it is and the health benefits we have experienced since we started using it a little over a year ago.
I'm certain she still thinks it's just a "fad" food, but I don't care. We are extremely healthy eaters and we LOVE LOVE LOVE it. I don't see us giving it up any time soon, that's for sure!! 

Chocolate Chia Pudding, would easily be one of my favourite foods... I eat it for breakfast some days, other days I eat it for lunch. I eat it for dessert and I take it on picnics. The kids love it, the hubby loves it. It's a winner all 'round! Did I mention it's HEALTHY?! That's right! It is incredibly good for you and it's super easy to make too :-D

It has helped me loose weight, satisfied many cravings and been a saviour for my daughters and my own digestive systems that have suffered severely from gluten sensitivities over the years.    
Thank you chia seeds!

It is gluten free, refined sugar free, raw and packed FULL of nutrients.


Here is how I make it....

CHOCOLATE CHIA PUDDING

In an 800ml mason jar, add:

500ml raw milk (or 200ml kefir and 300ml raw milk)
1/2 cup pure maple syrup
1teaspoon of vanilla extract

Put the lid on the jar and give it a little swish around to combine the maple syrup and milk. Then add:

1/2 cup of chia seeds (white or black is fine, there are no nutritional differences in the different colour of the seed) 
1/4 cup of raw cacao powder

Put the lid back on and give it a really good shake to combine all the ingredients. Place in fridge and give it a good shake every time you are nearby the fridge to make sure that the seeds don't clump up too much.
I like to leave it overnight, but it is ready to eat within about an hour.

If it is really clumpy, you can pour it into a big bowl and use a hand whisk to break up the chunky bits then pour it back into the jar to store in fridge, giving it a good shake before each serving. 
You can also adjust the flavour at this point too. Add more maple if you like it sweeter and more cacao if you like a stronger chocolate flavour.

I like to pour some into a bowl and cover it in fresh organic fruit. It tastes amazing with banana and kiwi fruit. It is also delicious with frozen blueberries, fresh strawberries and kiwi fruit!


PS. I am up at midnight, sewing and eating this! Best!!!

Thursday 16 October 2014

Myotherapy

I have a rotated pelvis. It has caused me a great deal of pain for about 8 years now. I don't even want to know how much I've spent on treatments....it's a lot, I'm sure.

I have seen more chiropractors than I can poke a stick at. They have given me little to no relief and certainly nothing has worked long term. They spend 5 minutes doing a bit of cracking and clicking and fluffing around. They gave me a pelvis/hip stabilising brace to wear and tell me to come back twice a week for a month, then once weekly for  another month or so, then fortnightly.....and so on!  But they never actually really do much to help me... They do too much talking and not enough fixing!

I've also tried physiotherapy, which also didn't really help me. They made me very, very sore with all the hardcore manipulation of extremely tender muscles.

Given the fact that treatment costs so much and does very little, I have been putting off seeing anyone.
After moving house (packing, cleaning, gardening, moving, lifting, unpacking, rearranging etc), my back has pretty much said 'I've had enough!' and I found myself bedridden for 4 days recently. I couldn't even stand, it was very painful and it felt like there was a nerve being pinched which gave me shooting pain throughout my entire body, I liken it to what I imagine a massive electric shock would feel like.

I needed to see someone and I felt that enough was enough and I refused to pay a chiro or physio anymore....

I love alternative therapies and remedies, so I looked up Myotherapy.... I actually thought it was a type of massage and thought 'yessss, I can handle that' ;-)
I called the practitioner and told him about my pelvis and he was confident he could help me and booked me in for that afternoon.

I took my X-rays in with me, but he didn't even need to look at them. He had a feel of the muscles in my lower back and said he'd do some dry needling and cupping on me to loosen the muscles. He told me that because the muscles were so tense and spasming, they were pulling forward causing the pelvic rotation and pain I was experiencing.

I lay face down on the bed. It was one of those massage table types, with the hole for your face to rest in. The therapist started with a very quick massage to find the problem areas, then he started the dry needling.

Dry needling, from what I understand, is different slightly to acupuncture. With acupuncture, the needles are left in for a time, where with dry needling, they are tapped into the muscle to release the tension, and then removed immediately.

He used about 50 needles over my lower and middle back, as well as my thighs. Only about 4 of them actually hurt (more of a sting). They must have been in quite tender/sore muscles.

After the dry needling, he did some cupping on my back, which also draws tension from out of the muscle, covered me up and left me to relax for about 10-15 minutes.

While I was supposed to be resting, honestly, I was hoping that the treatment wasn't going to just be another expensive waste of time.

When the myotherapist came back in to remove the cups from my back,  I asked him when I'd need to come back.....because that's the way I've been dealt with everywhere else.
He told me I should come back in a week for another treatment, but I probably won't need to come back again after that!!!
I was shocked....it sounded too good to be true! Surely not? Really?!

After the hour (yes, an HOUR! Not 5-10 minutes like a chiro) was up and my treatment was finished, I was being super careful as I didn't want to drop to the ground in pain like I was doing beforehand. The therapist told me to move around, bend over, touch my toes if I want to. I was scared! But I did it....even though I was worried I'd still be in pain.

I paid the $80 for the hour appointment and went home.

I was told to have a really hot shower when I got home, so I made sure that I did that. I was in a bit of pain that evening, but more of a dull ache all over rather than short sharp pain like before.

The next morning, my back felt great! I could walk and bend over etc with no problems at all! Still sceptical, I was waiting for the pain to come back, but nope!!! It's been 12 days since my first appointment and I still haven't been back for the second treatment yet.....but I will!

AMAZING. I have been recommending Myotherapy to everyone! I'm amazed, simply amazed. What a life changer! I feel great :-D


*** The cupping left some bruising on my back, but this is normal ***


Sour Cherry Short Shorts


Hi there!

I bought this awesome cherry fabric months and months ago and never got around to making it into anything....until today!

It rained all day, so I figured it was a perfect day to stay in my pjs and just bum around the house! I sat at my sewing machine for a while, thinking....procrastinating and digging through my fabric boxes hoping something would 'jump' out at me.
The cherry fabric, did just that, so I whipped it out and thought I'd make my daughter a dress from it.
I flicked through various little girls dress patterns, but couldn't find the particular style I had in mind, sooooo, I thought 'SHORTS' for me!

I don't have any sewing patterns for ladies shorts, so I decided to experiment a little!

Grab a cuppa and read on! This is how I made them.....


Ladies Sour Cherry Shorts Tutorial

1. Find a pair of shorts that fit you well. I chose this old pair of shorts that I usually only wear around the house. I like the length and fit of them.

 Fold them in half and flatten them out, making sure you can see the shape clearly. Place them on top of your fabric and cut around them. Don't forget to cut a few centimetres bigger, allowing for seam allowances.

 Follow this method for the back of the shorts too. 


2. Once you have cut out the front and back shapes, turn the piece over and cut 1x front & 1x back on the reverse side. You will have 4x pieces in total.


3. Take 1 back piece and 1 front piece, place them right sides together and pin the crotch area.

Repeat on the remaining 2 pieces.


4. Sew the crotch area together on both pieces. 

(I sewed a basic straight line, then went over it with a zigzag stitch and trimmed the edges. You could use an overlocker if you prefer.)


You should now have 2 pieces that look like this.... 


5. Place the 2 pieces with the right sides together. Pin and sew the whole way around the "U" shape. Finish seams with a zigzag stitch or by using an overlocker.


6. I like to press all the seams with the iron and then use a basic stitch to hold them down. It gives a neat finish on the final product.


Don't mind my wonky stitching, I had to keep stopping and starting to break up fights between my kids. You get the idea though.....it gives a top stitching effect to the right side of the garment.


7. Turn your fabric the right way out and admire! Really looking like shorts now!


8. Place the right sides together again and pin the sides of your shorts. Stitch them together and finish the seams.


9. Fold and press the hem of the shorts 1/4 of an inch, then fold over again another 1/4 inch, press and pin. Repeat on other leg.


10. Top stitch the hems. I just used the edge of the presser foot as a guide.


Top stitching again....


Now, to make your waistband!

11. Measure your waist and cut a string long enough for you. Make sure you allow enough room to be able to thread your elastic through!

Fold in half lengthways with the wrong sides together. Press and pin the raw edges and sew them together with a basic stitch. Don't forget to leave the short ends open!


12. Pin the raw edge of the waistband to the outside of the shorts. Imagine that when the waistband is folded up that the seams will be hidden insde the shorts.

13. Sew the waistband along where you have pinned and finish the seams.


14.  Measure some waistband elastic on yourself then, using a safety pin, thread it through the ends if the waistband.

15. Once the ends are through, secure the elastic with a strong stitch on your machine and then stitch the open ends closed.


Ta da! You are finished!! 


16. Press and admire your new shorts!!! 


I love mine!!! I love that I can dress them up and I can dress them down!